Automated Testing and Linting for Python Projects
- PublishedAugust 2, 2020
- Length3 Minutes
- CategoryTutorials
A step-by-step guide to setting up Pytest and Flake8 on Mac OS and GitHub Actions for a cleaner, more stable Python 3 application codebase.
About the Author
Dan is a front end engineer working on design systems. Previous roles include: Huge, Cvent, Gifn, and PRPL. For more information, see here.
Questions & Comments
If you have feedback, view this post on GitHub and create an issue or open a pull request with edits. Thanks for reading!
I don't work on Python projects very often, so when I do, I usually need to start from scratch and look up the latest (read: easiest) way to setup automated tests and linting. Luckily, open-source libraries and continuous integration platforms have made the process quick and free. After testing a few different combinations, I've found a solution that works well for me and I hope you'll find it similarly helpful.
First, we'll configure Pytest and Flake8 in our application. Second, we'll integrate those into our local Git workflow using Git hooks (via pre-commit). Third, we'll mirror our local testing in a GitHub Action which will run against pull requests and ensure no wonky code makes it into our main branch.
Prerequisites
In order to dive right in, you'll need to have Python3, a local git repo, and a remote GitHub repo. If you have those already, skip ahead to the next section.
- Python 3: To check whether Python 3.x is installed, run
which python3in terminal. If the command is not found, follow the official guide. - GitHub repo: If needed, create a GitHub repo.
- Local repo: If you're starting from scratch, clone the GitHub repo created in the step above. If you already have a local project but haven't linked your remote Git repo, see the GitHub docs for steps.
Install Dependencies
In the root of your project, create a requirements.txt file and add pytest, flake8, and pre-commit project dependencies:
1####### requirements.txt #######2pytest3flake84pre-commit
Next, run the following command to install with pip:
1python3 -m pip install -r requirements.txt
Run Test Command
After installing Pytest and Flake8, create a sample test to ensure everything is working as expected. First, create src/main.py and add a sample function:
1# main.py2def add(a, b):3 return a + b
Next, create src/main_test.py and add the following test assertion:
1# main_test.py2from main import add34def test_success():5 assert add(2, 2) == 4
We're now ready to run the test suite. In terminal, you should see a success message when running the following command:
1➜ pytest2========================== test session starts ==========================3platform darwin -- Python 3.7.5, pytest-5.3.2, py-1.8.1, pluggy-0.13.14rootdir: /Users/dan/projects/python-app-testing-and-linting5collected 1 item67src/main_test.py . [100%]89=========================== 1 passed in 0.01s ===========================
Before continuing, add an intentionally failing test to ensure it is also picked up by the pytest command. You should now see something like following:
1➜ pytest2========================== test session starts ==========================3platform darwin -- Python 3.7.5, pytest-5.3.2, py-1.8.1, pluggy-0.13.14rootdir: /Users/dan/Sites/experiments/python-app-testing-and-linting5collected 2 items67src/main_test.py .F [100%]89=============================== FAILURES ================================10_____________________________ test_failure ______________________________1112 def test_failure():13> assert add(3, 2) == 414E assert 5 == 415E + where 5 = add(3, 2)1617src/main_test.py:9: AssertionError18====================== 1 failed, 1 passed in 0.06s ======================
Before going back and fixing the failing test, leave it as-is in its failing state. We'll come back to it later.
Run Lint Command
Next we'll identify undesirable formatting within our code. To do so, edit your test file and remove the line breaks from in-between the sample tests and save.
1# main_test.py2from main import add3def test_success():4 assert add(2, 2) == 45def test_failure():6 assert add(3, 2) == 4
If your editor is automatically applying standard formatting as you save, that's great. It will make things easier going forward. That said, for this next example, humor me and bypass it temporarily. If you're using VS Code, select File: Save without Formatting from the command palette:
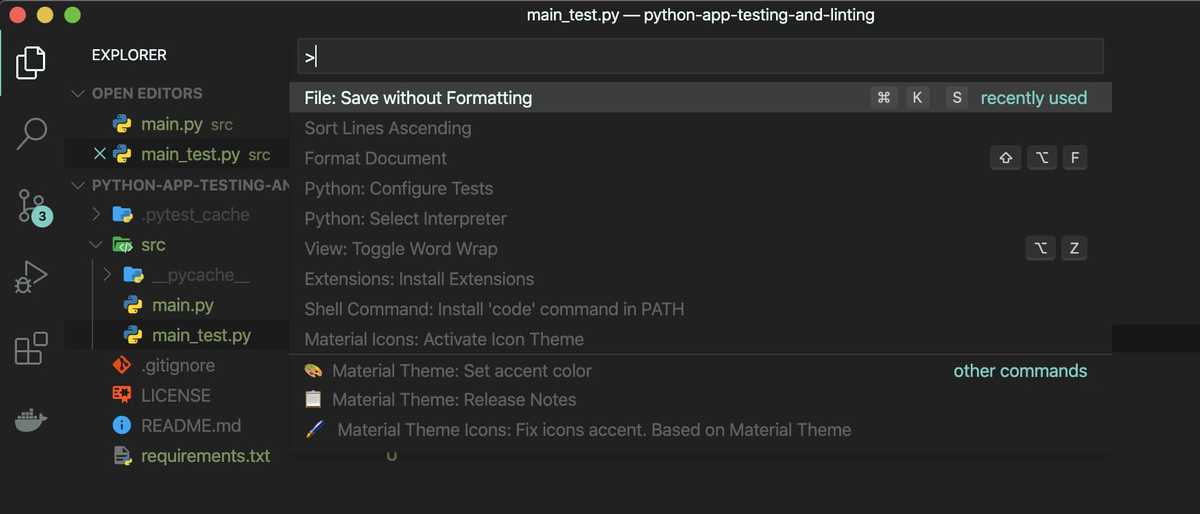
Now run flake8 in terminal and observe the formatting issues it discovered:
1➜ flake82./src/main_test.py:2:1: E302 expected 2 blank lines, found 03./src/main_test.py:4:1: E302 expected 2 blank lines, found 0
Instead of going back and fixing the issues, keep reading. We'll setup an automatic Git hook in the next section where they'll serve as a useful example.
Add Commit Hook
To automatically validate formatting before code is checked-in to version control, we'll set up a pre-commit hook (using the aptly named pre-commit package). In your project root, create .pre-commit-config.yaml and add the following:
1repos:2 - repo: https://github.com/pre-commit/pre-commit-hooks3 rev: v2.3.04 hooks:5 - id: check-yaml6 - id: end-of-file-fixer7 - id: trailing-whitespace8 - repo: https://gitlab.com/pycqa/flake89 hooks:10 - id: flake8
Next, run pre-commit's install script to add the hook:
1➜ pre-commit install2pre-commit installed at .git/hooks/pre-commit
We're now ready to commit the changes in a new Git branch and in doing so, test the newly installed hook. To do so, follow the commands below:
1➜ git checkout -b add-tests-and-linting2Switched to a new branch 'add-tests-and-linting'34➜ git add .56➜ git status7On branch add-tests-and-linting8Changes to be committed:9 (use "git restore --staged <file>..." to unstage)10 new file: .pre-commit-config.yaml11 new file: requirements.txt12 new file: src/main.py13 new file: src/main_test.py1415➜ git commit -m "Add test and linting configuration"16Check Yaml...............................................................Passed17Fix End of Files.........................................................Passed18Trim Trailing Whitespace.................................................Passed19flake8...................................................................Failed20- hook id: flake821- exit code: 12223src/main_test.py:2:1: E302 expected 2 blank lines, found 024src/main_test.py:4:1: E302 expected 2 blank lines, found 0
If you retained the intentional formatting errors from the previous section, your attempt to commit should be rejected based on the flake8 formatting check. Go back to the test file, fix the formatting (but leave the failing test), and retry the commit. This time, it should succeed as expected.
1➜ git add .23➜ git status4On branch add-tests-and-linting5Changes to be committed:6 (use "git restore --staged <file>..." to unstage)7 new file: .pre-commit-config.yaml8 new file: requirements.txt9 new file: src/main.py10 new file: src/main_test.py1112➜ git commit -m "Add test and linting configuration"13Check Yaml...............................................................Passed14Fix End of Files.........................................................Passed15Trim Trailing Whitespace.................................................Passed16flake8...................................................................Passed17[add-tests-and-linting 66ebd44] Add test and linting configuration18 4 files changed, 28 insertions(+)19 create mode 100644 .pre-commit-config.yaml20 create mode 100644 requirements.txt21 create mode 100644 src/main.py22 create mode 100644 src/main_test.py
Note: If you're adding this to an existing project, pre-commit's docs recommend running pre-commit run --all-files to run lints against existing files as a baseline. By default, it will only run against the files updated in a commit.
Before setting up the GitHub Action in the next section, push the newly created branch and open a pull request:
1➜ git push origin add-tests-and-linting2Enumerating objects: 8, done.3Counting objects: 100% (8/8), done.4Delta compression using up to 8 threads5Compressing objects: 100% (6/6), done.6Writing objects: 100% (7/7), 853 bytes | 853.00 KiB/s, done.7Total 7 (delta 0), reused 0 (delta 0)8remote:9remote: Create a pull request for 'add-tests-and-linting' on GitHub by visiting:10remote: https://github.com/xdmorgan/python-app-testing-and-linting/pull/new/add-tests-and-linting11remote:12To https://github.com/xdmorgan/python-app-testing-and-linting.git13 * [new branch] add-tests-and-linting -> add-tests-and-linting
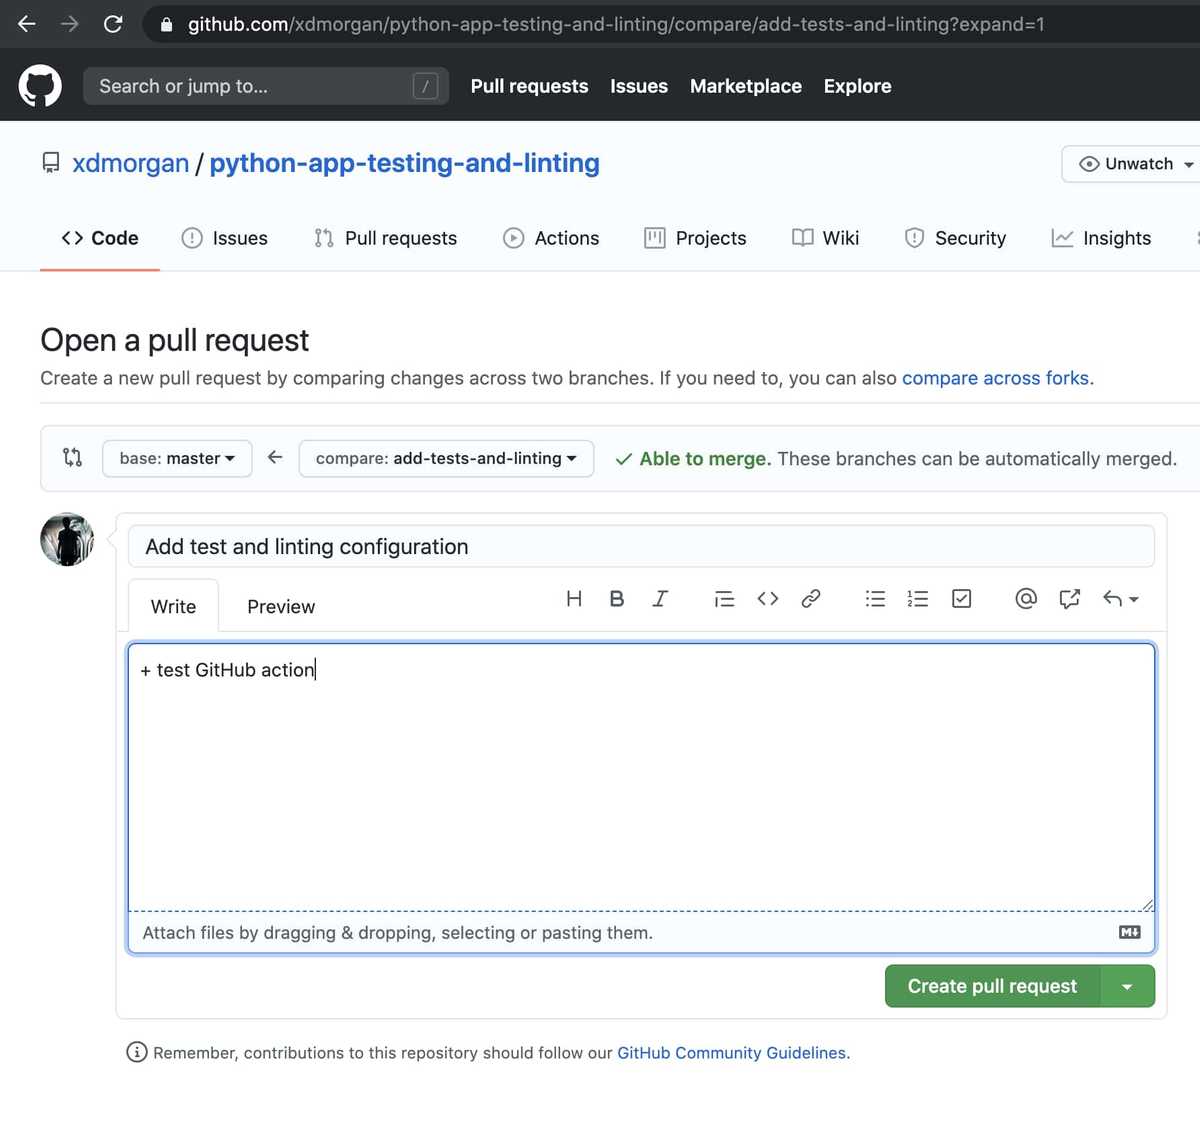
Add GitHub Action
Now that everything is working as expected locally, we'll add a slightly modified version of this community GitHub action to run the test suite and linting in a continous integration environment. To get started, create .github/workflows/python-app.yaml with the following contents:
1name: Python application2on:3 push:4 branches: [master]5 pull_request:6 branches: [master]7jobs:8 build:9 runs-on: ubuntu-latest10 steps:11 - uses: actions/checkout@v212 - name: Set up Python 3.813 uses: actions/setup-python@v214 with:15 python-version: 3.816 - name: Install dependencies17 run: |18 python -m pip install --upgrade pip19 pip install -r requirements.txt20 - name: Lint with flake821 run: |22 # stop the build if there are Python syntax errors or undefined names23 flake8 . --count --select=E9,F63,F7,F82 --show-source --statistics24 # exit-zero treats all errors as warnings. The GitHub editor is 127 chars wide25 flake8 . --count --exit-zero --max-complexity=10 --max-line-length=127 --statistics26 - name: Test with pytest27 run: |28 pytest
Once the workflow file is created, commit it, and push the branch to update the open pull request in GitHub. Upon refresh, there should now be a check that was started automatically.
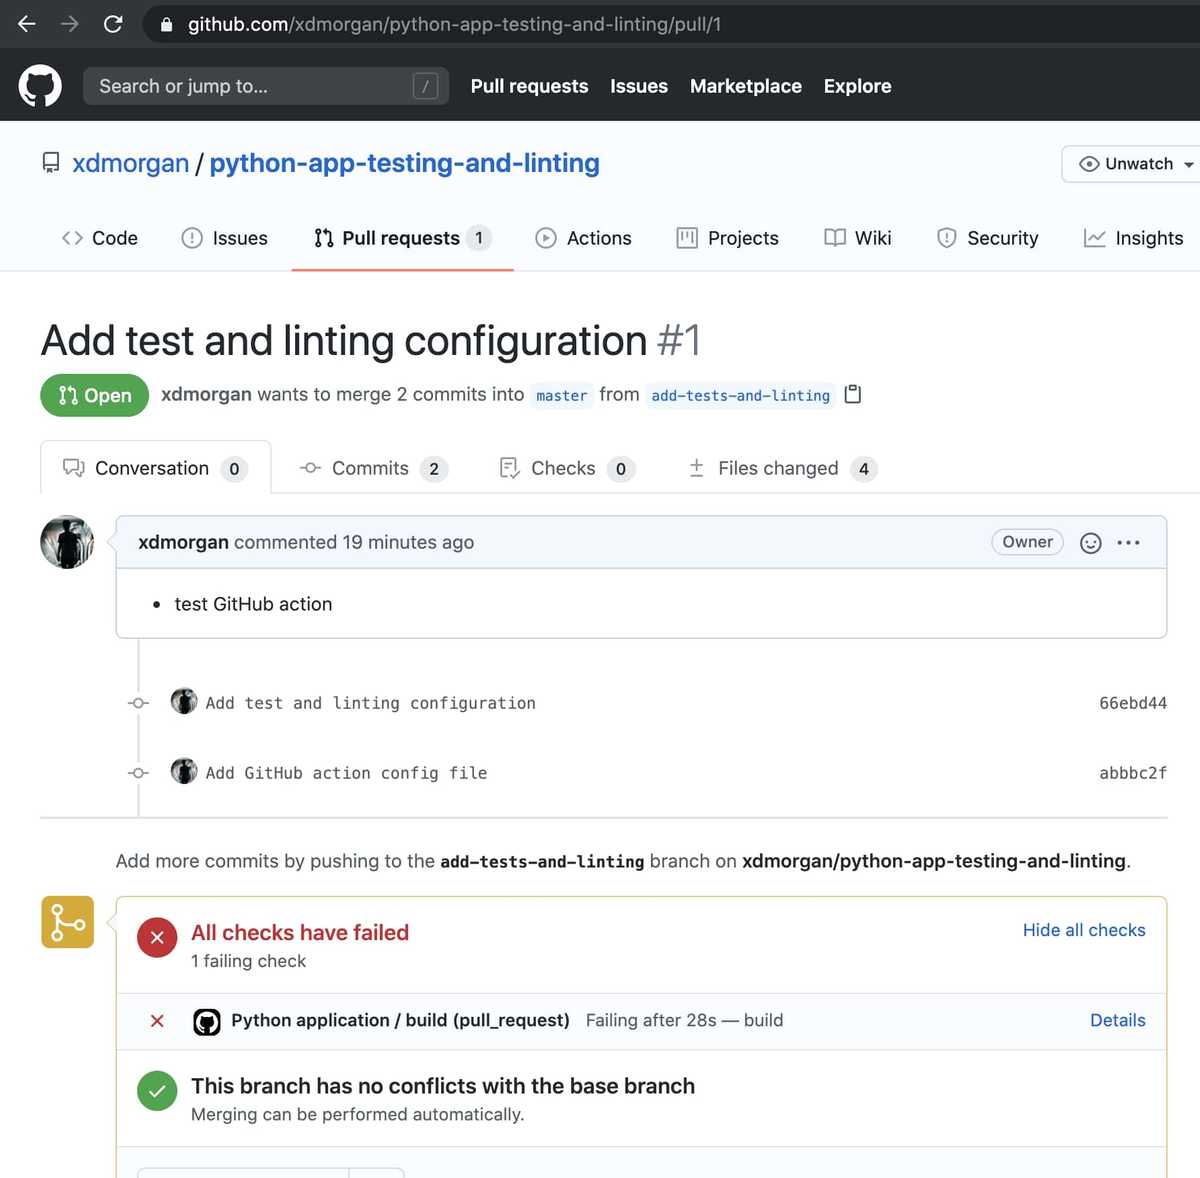
Depending on how you look at it, this is either a disappointing or desirable outcome, all checks have failed. Click Details and check the output in the Actions tab.
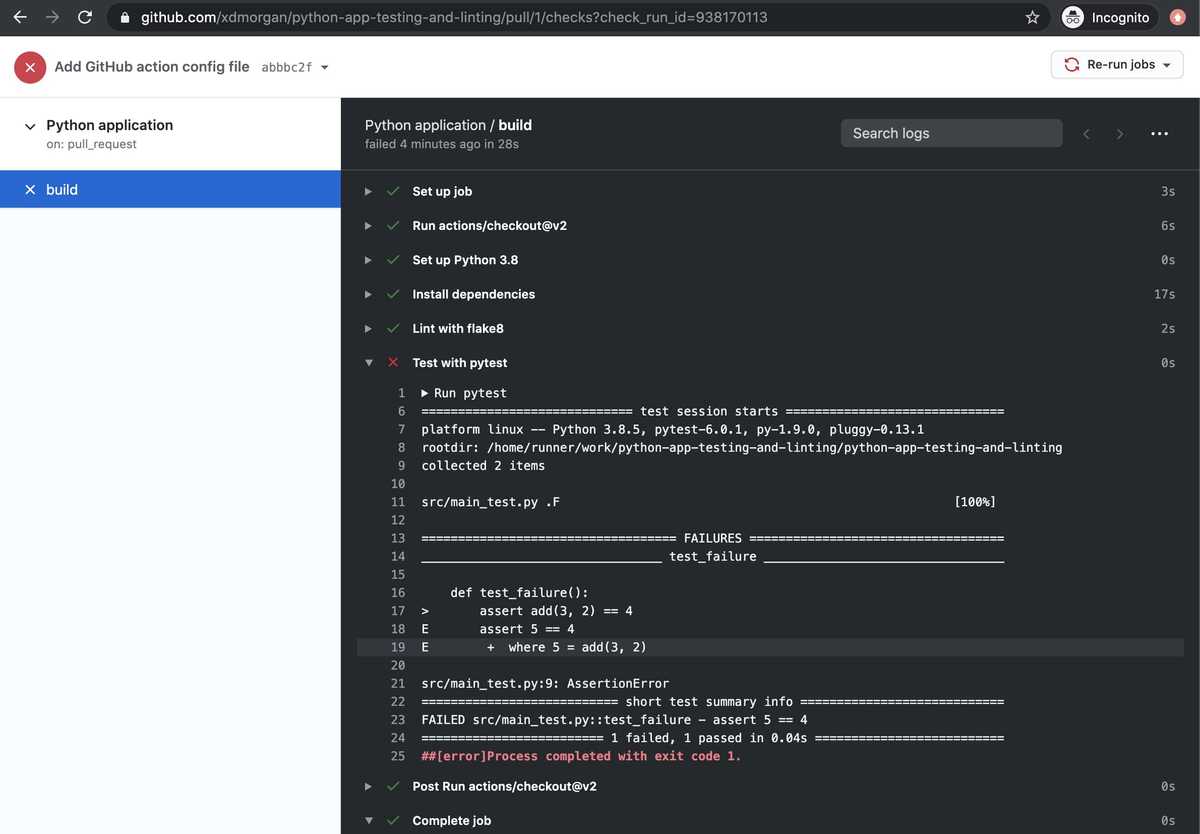
If you're following along, you should see the failing test we added earlier. Remove or fix it locally then commit and push the changes to kick-off a new build.
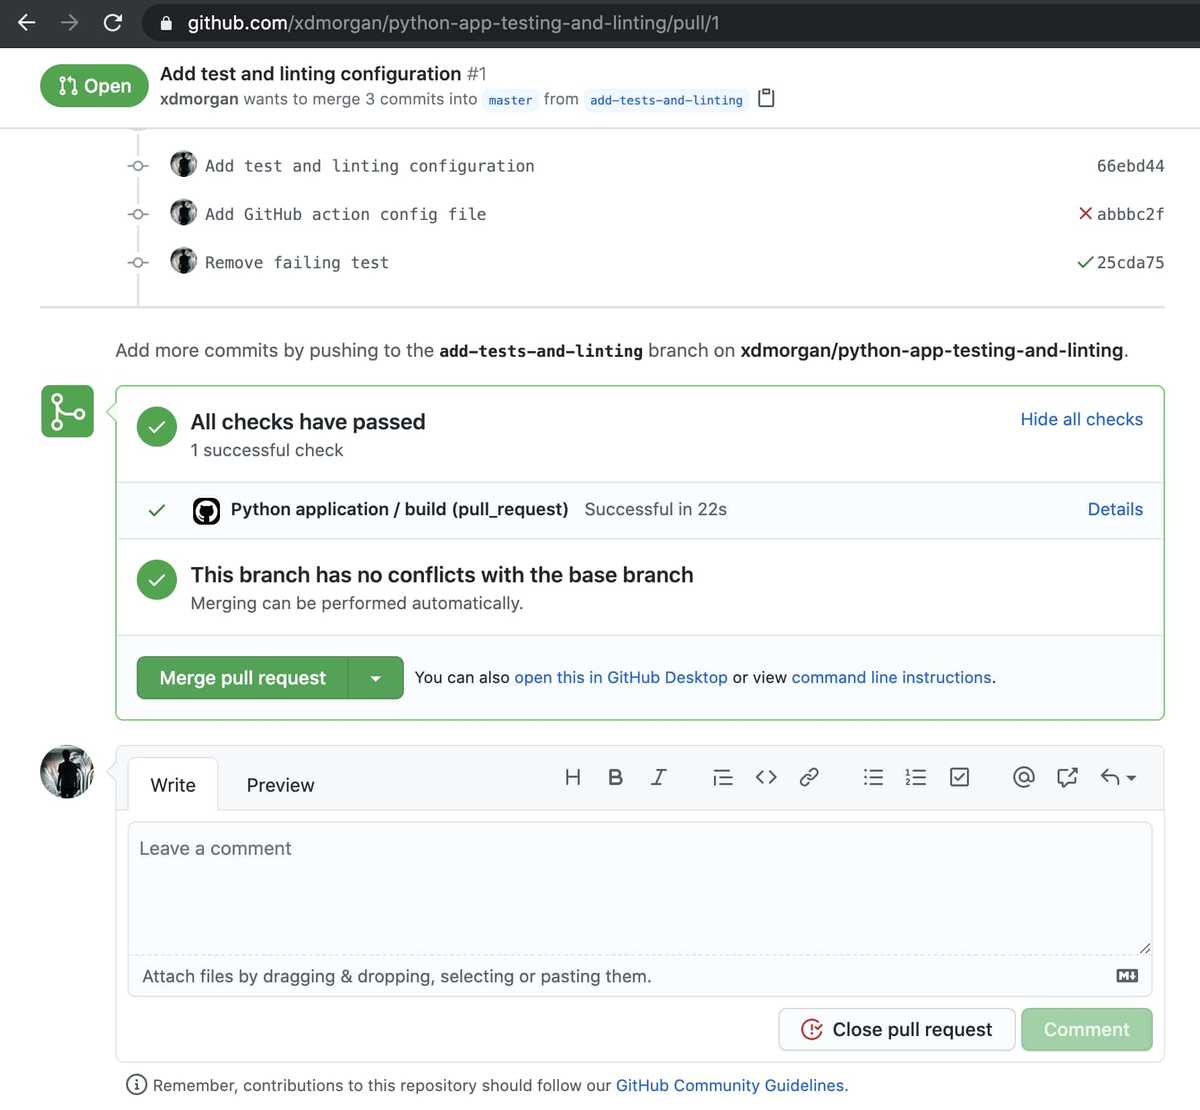
This second time around, all checks should pass. With that, everything is set up both locally and remotely. There's nothing left to do but smash that merge button and go home for the day. Our work here is done.
TL;DR: Link to Code
In a hurry? Want to use the end result as a starting point for your next project? See xdmorgan/python-app-testing-and-linting on GitHub for everything covered above.
As I continue to adjust my workflow, I'll update this periodically. In the meantime, if you find any problems or know of a better way, please feel free to create an issue or open a PR against the demo repo linked above. To suggest an edit to this article, use the link in the sidebar.

